Showing posts with label bookmarks. Show all posts

Monday, January 6, 2014

As Soon As I Finish This Chapter

No doubt about it I am a 
Book Nerd and Book Nerds collect Book Nerd Friends
so I made up of few of these bookmark cards for my nerdy friends.

All products are PaperTrey Ink
except
for su scallop punch.

 Purchase my kits at the following:
My Memories Store Sara's Creative Adventures
Shoplocket Store

 Sara's Creative Adventures is Social:
Facebook
Twitter
Pinterest
LinkedIn

Thanks for stopping by today;)

Friday, November 29, 2013

Friendship Bookmark Card

It is Black Friday, the busiest shopping day of the Christmas Season, or so it used to be.
I can't wait for the numbers to come in and see what happened with stores being open on Thanksgiving.
I am however happy to be out of the box store retail business this time of year. 
 It is just a madhouse and totally
had me ruined on Christmas for along time.
Happy to report Scrooge has left the building and my Christmas Spirit has returned;)

So my creation today is a card with bookmark.
 The Blog
 held my inspiration project.
You can see the card HERE.

My CASE creation:

All products used are PaperTrey Ink EXCEPT for SU scallop circle punch.

Purchase my designs in the following stores:
 Sara's Creative Adventures is Social:

Thanks for stopping by today;)

Saturday, November 2, 2013

Eureka Stamps Blog Hop, Great Gifts To Give!

 Welcome to our Eureka Stamps
 and
QKR Stampede
Handmade Gifts blog hop!!!!
We are so excited to share with you
Our handmade gifts perfect for any holiday!
You should of arrived here from Eureka Stamps Blog

Don't forget to leave comments along the way as there will be a prize from every blog along the hop. Each blog be choosing a winner from the comments left on their hop posts!
These winners will each win a 2 digital image of their choice.
The Grand Prize winner of the hop will be chosen from the very last stop, which is  
This winner will receive 5 digital stamps of their choice from the
Eureka Stamps.
The hop will run for 1 week and end on Thursday November 7th 6PM EST,Tthe lucky winners will be announced on Eureka Stamps blog on Saturday Nov 9th
Your next stop is Karen!
Today I will be showing you a very cute apple goodie basket.
I was inspired by my 4th grade teacher, Mrs. Dykstra and her fun little
reward box for learning our multiplication tables.

This is my version for J's 2nd grade class...
Cut file from Silhouette Cameo America Store:

Below you will find all the details for the products I used.
Star Pencil Toppers:
 using digital stamps

Great Work Digi5504
http://www.eurekastamps.com/proddetail.php?prod=digi5504

Super Kid Digi8601
http://www.eurekastamps.com/proddetail.php?prod=digi8601

The Silhouette cutfile is from the Silhouette America Store
 

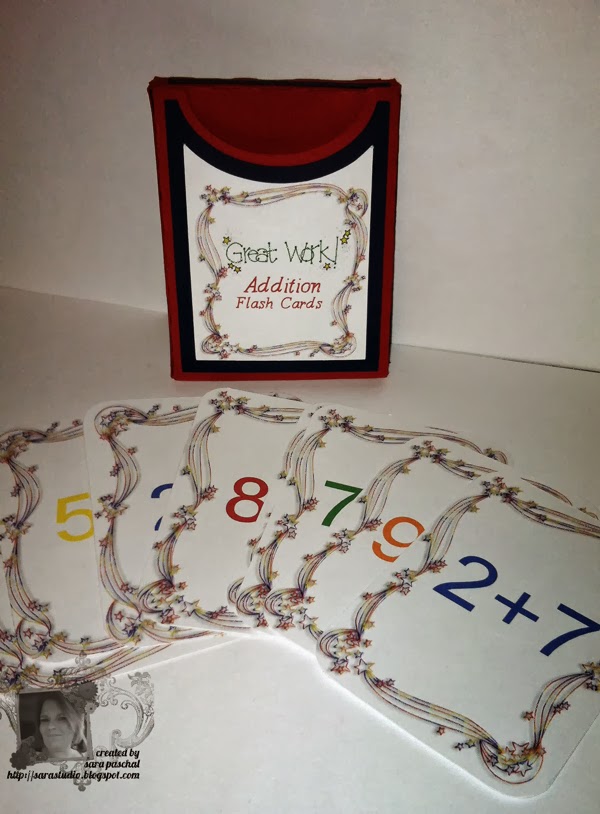
 Addition Flash Cards:
 
 using digital stamp

Stars and Ribbon Frame digi11903
http://www.eurekastamps.com/proddetail.php?prod=digi11903

Silhouette America cut file:
Bookmarks:
Digital stamp used:

Star Border digi38801
http://www.eurekastamps.com/proddetail.php?prod=digi38801

Cut files from Silhouette America store:

Visit all the above links and see what the amazing DT has for you.  
Plus it will give you more chances to win;) 

 That completes the contents of my gift.
Please keep reading to see in depth how some of the creations were made.
*************************************************************************
 For those that are new to the world of digital stamps I have a quick refresher for you.

How to use digi stamps with PSE10.
Open your donwnload stamp file.  
This file comes as a jpg from Eureka Stamps that means it has a white background you will need to remove this background for my technique.
Click on the background eraser tool as shown below.
Click onto the white background you will see it be removed and the transparent layer appear.


I wanted to do something special with this image so I added a preloaded effect.
Color Target was my choice.
In your effects panel pick the Color Target Effect under the complex label and apply it to your digital stamp.
Now save your colored digital stamp as a png file to preserve the transparent background.

 Below is my saved digital stamp in png form...

Below you can see that I have opened my save PNG digital stamp in my
Silhouette Cameo designer software.
Now I am ready to print and cut my bookmarks...

Here are two completed hybrid bookmarks.
The 3d star from Lori Whitlock is one of my fave cuts on the Silhouette;)
 
 
Links for digital stamps used from Eureka Stamps:


From Eureka Stamps sister store
QKR Stampede...


You can find these images and many more when you shop
the Eureka Stamp Store.   They offer rubber and digital images giving
you the best of both creative worlds.
Please stop by Eureka Stamps Store and have a look around.
Sign up for our newsletter while you are visiting
 so you don't miss
one single moment of the good stuff.


Thanks for stopping by today;)

Friday, August 9, 2013

I'm Booked T and Silhouette Cut File Tut

 I have had my fabric paint starter kit from Silhouette now for half a year.
Finally I have decided to make use of it;)
Had to make myself a little treat so I could show off one of my favorite past times.

I have the cut file for sale over in my shoplocket store.
You can also fill it in and create a print/cut file to your liking.
Here are some bookmarks I did just that with...


 Here is the cut file preview...
Purchase your studio cut file today with the link below.

Here is a tutorial on how to use the studio cut file as a template for t shirt fabric painting.

1.  Wash and dry the fabric you are going to use.
2. Tear off a 12' by 12" piece of freezer wrap paper.
3.  Attach the freezer wrap paper to your Silhouette Studio Carrier Mat.
4.  Open your Silhouette Studio Design software.
5.  Select open file.
6.  Find and open the I'm Booked cut file.
7.  Size to your liking for your project.
(If you wish you can also color the file and change the cut settings so you can create just a print file such as I did for the bookmarks shown above.)
8.  Send file to Silhouette Cameo Cutter.
9.  Carefully remove the freezer paper from the cutting mat.
10.  Iron your fabric on the hottest setting allowed.
11.  Center your cut stencil on your fabric SHINNY SIDE down.
12.  Iron on the Freezer Paper Stencil.
13.  Place cardboard inside the fabric to avoid transfer of paint to the other side.
14.  Using paint created for fabric or acrylic paint mixed with a fabric medium
(both are available at your local craft store)
carefully dab on the color using a foam brush or a sea sponge.
15.  Let the paint dry.
16.  Remove the Freezer paper stencil.
17.  Show off your creation proudly.


Thanks for stopping by;)

Monday, January 11, 2010

PTI Swap Card/Corner Bookmark

I was almost stumped by this round of swapping, I so love to do things with each swap card that is new and creative. This round I came up with a corner bookmark, it is so easy for our DD little J to pull out my bookmarks it makes them almost useless to me this style took her a bit longer to figure out, LOL! And yes, I am a wishful thinking a tad by using PTI's Wishing you set I wish it were tulips covering the ground

My .cut files are distributed free of charge however, since I made this card for this round of PTI swapping to obtain this file I am requiring a few things first, please do the following... Become a follower of my blog, become a follower of Inspired Paper Crafters then come back to this post leave a comment with your contact email and I will send you the file.

Tutorial for Corner Bookmark Card

Cut all pieces using the Cricut .cut file I have created.
Score the tabs of the card front.
Tape the scored tabs on the card front.
Fold the tabs in and adhere the top triangle of the corner bookmark card front.
Place embellishment ribbon on the front layer piece and adhere to the corner bookmark card front.
Finish creating your corner bookmark card front.
Next create the pull out card portion.
Insert the pull out card into the corner bookmark.
Give as a little gifty card make sure you explain how to use the outer portion to the recipient.

I also thought this would be amazing as a Save the Date Corner bookmark card used as a Birthday hat. The inner portion would contain the save the date and the outer portion becomes a child's corner bookmark.


Wednesday, May 16, 2007

Kids club Book Marks


I have been working on some small bookmarks for Wed. night Kids club, I can't believe that it is the last night and they are out of School on Friday. My oldest D. helped me color some in so that was good. Here is how they were made: Ran recycled cereal boxes through the Sizzix on the two largest squares. Ran the card stock through xyron and then the sizzix the colors I used were, yo yo yellow, pink passion and blue non SU. The image is a retired SU set I borrowed from my Sister it is called All God's Children, I love it! The images were colored in with colored pencils. Next I put them together using E600 adhesive and double stick tape. Nice little gift hope they like them.

Monday, May 14, 2007

Teacher Thank You's Paper Clip book marks


My girls and I spent Sat and Sun working on Teacher thank you projects, they get out of school on Friday. (It will make my youngest happy, but I don't think I am ready for all of the fighting and the Mom's she did this and that, UGH!) However, I am looking forward to the swimming pool, lake, shopping and weekend trips. We are planning our annual trip to the Omaha Zoo over Memorial Day weekend.
Back to the crafts, both girls made bookmarks with the jumbo paper clips ( I found them at Wal-mart for under $1.00 for 15). We broke out the recycle bin and cut up cereal boxes for our chipboard then ran it through the sizzix. Next they chose the colors they wanted ran them through the Xyron and then the sizzix. After they layered up the chipboard we glued on to the clip using E600 glue and let dry.
For the card we used the flower die cut and the buckle slide die cut. The thanks was stamped with the Many Thanks Set in Only orange we combined to challenges over on SCS to complete the project, TLC115 end of school year and LSC115 wide open spaces.