Showing posts with label Sassy Studio Designs. Show all posts

Saturday, May 18, 2013

Sassy Graduation

Wow, today I actually have a longer blog post for you all so grab a cup and enjoy;)
I will start with 
Hop on over there and create an account you will find so much creativity it will blow your mind.
You will also find challenges and some freebies listed in the groups.
Now that bit of 411 leads me to
 over on PCP.
*They have started a new freebie of the month program
you will need to play along and post your creations
using the free image of the month.
After you do so you will then receive the following
months freebie.
*complete rules are posted in the PCP SSD group.


Here is my card creation using
SSD Sassy Graduation freebie of the month...
I found this really cool cut over on
Silhouette Studio America site called
Graduation background.
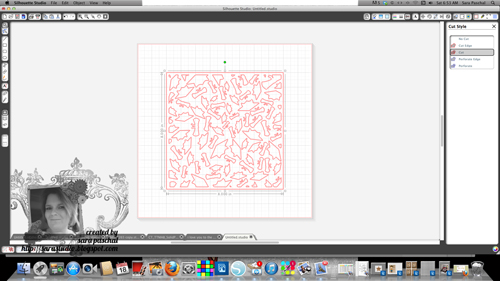
I did not want to cut the file I wanted a colored background for my creation so here are the steps I took to change the file.

Download and open your file in Silhouette Studio Software.
Click on the little scissors and line button on the top right of the screen.
This button will show you your cutting choices.
Click NO CUT.
 

Now I wanted to color the image because I no longer had a cut file. 
I went with black for my creation.
Highlight your image and click the color you wish to use.

It is hard to see below but next I opened the card cut file I was going to use
A2 Lori WhitLock Bracket Easel Card found in the
Silhouette Studio America store.

I did a quick copy paste of the file and slid it over
the card piece I wanted it on.
(I did not show you the steps I took to separate the card file pieces in this post.)
Now you are ready to print and cut your pages.
Do not save file unless you wish to permanently alter your download cut file.

Products used:
Sassy Studio Designs Sassy Graduation digital stamp
 
Silhouette Cameo/Design Software
downloads: Graduation Background and A2 card cut file

PTI Pure Poppy Ribbon and card stock along with for the graduate stamp set.

Eureka Stamps Congratulations sentiment

Bling form Recollections

PSE10

Thanks for stopping by today;)

Thursday, January 24, 2013

Embossing with Digital Stamps Tutorial

Thanks for stopping by today, I have a wonderful
tutorial treat just for you.
Embossing with Digital Stamps

Today I am using the Skater Girl from
Sassy Studio Designs.
She was a freebie over on Paper Craft Planet
last Friday.
Please see yesterdays post for the 
card and more details on the image.

Here she is, the image I am going to feature in today's tutorial. 
 I LOVE HER, so fun to work with.
The girls were fighting over my finished card from yesterday
as to whom was going to keep it.;)


I am also going to be using this digitally colored
version of the stamp.

Here we go, are you ready to have your mind blown?

Step 1:  Digital stamp files come as jpg or png, you will need to open your digi stamp in photoshop make a duplicate file and save this file as a PSD.   
This will only work using a psd file!
*While you have it open you can color and/or add in your digital papers as I have done above then save as a PSD.  I prefer the finished look with the colored image, there is more texture.  I love how it even picked up the pattern of her top and the skateboard.  It is totally SICK!

Step 2:  Open a new project in photoshop 8 1/2" by 11" size,  load it with a solid fill color.

Step 3:  Move up to FILTER, scroll down to TEXTURE  then TEXTURIZER
Step 4:  Texturizer will open up in this screen shown below,
you will need to load your PSD file here.
Click the circled arrow and you will get a load texture prompt, click on the prompt.
Procede to your digi Stamp PSD file and open it.
You will see your image appear as shown below.


The texturizer screen...

Step 5:   You can make many adjustments with the scaling, relief and light selections.  You can also invert the image in this section.

Step 6:  After the image looks the way you want it click ok and you will be brought back to the main edit screen.

Step 7:  Save your new file, I will usually save it as a PNG however,  jpg also works.

Embossed Digital stamp as is...

Colored digi, see what I mean about the extra detail?

 So have I blown your mind yet?
If not and you can handle more keep going as I show you
how to make a seamless embossed pattern that you can use
to make 12"by 12" digital paper.

 Open a new file 1" by 1", load the background color you wish.  Obviously I used red here.
Open another new file and fill it with the pattern you desire, save this file as a PSD.
For example in the top photo I have filled my new document with this really awesomesaucy heart pattern from succo design.
Yeah, I had a good laugh at their name as well;)
Make sure you save this heart design file as a PSD.

Follow steps 1-6 above

Now when you are back to the edit screen do this...
Edit
Define Pattern
Save your embossed pattern
Click on the paint bucket making sure you check the pattern box and use the drop down arrow to pick the pattern you just created.
Open a new file this time use scrapbooking 12" by 12"
Click on your new file, the paint bucket will now seamlessly fill your 12 by 12 page.

Is it not beautiful or what?
Thanks for stopping by today;)
You can email me with any questions you may have: 
paschal.sara@gmail.com

Wednesday, January 23, 2013

Monstrously Sassy Skater Girl

Here is another freebie from
Make sure you scoot on over to
because every Friday they have a freebie up for grabs.
(You have to hurry however, the freebie is only posted for a limited time.)
This coming Friday will be your next chance to join in.

This week it happens to be
Skater Sassy

Here is my card...

Here she is digi colored in photoshop...


I used this kit from
Monster Girls

Thanks for Stopping by today;)

Wednesday, January 16, 2013

Dare to be SASSY!

Sassy Studio Designs is retiring some of the older  digi stamps, they were
giving this one away on PaperCraftPlanet as a Friday Freebie.
"Cheerful Chelsea"
The challenge is called,
Out with the OLD.
I used The Posh Collection from Teresa Collins on the first creation,
the second is very old BasicGray.


Thanks for Stopping by Today;)