Showing posts with label Airbrush. Show all posts

Friday, May 13, 2011

Moxie Fab Chevron Challenge


The background on my card was from Cath's post it was the pic of chevron fabric that I played with a bit to make a background.  The stamp is from...you guessed it...We R Memory Keepers Merry January Collection.  Sentiment and cardstock are  PTI.  I even broke out the airbrush for this beauty.  Thought I had better use it before DH claims it because it has been collecting dust in my world as of late.
Nesties Rectangle die
Stampin' UP Word window punch
Google Eye
Dimensional dots

Here are some of my favorites in Chevron...
Below is my favorite Chevron  look.  Black and White has always been my go to combo pair that with a bold graphic design and you have pure bliss;)


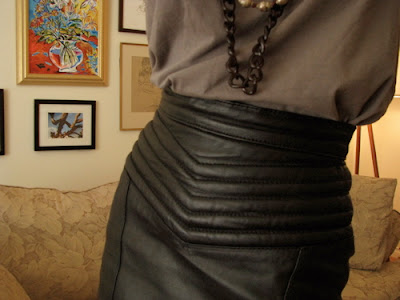
And check out this little number a leather Chevron skirt.  YUMMY!

Happy Stamp Day.  God Bless.

Wednesday, February 16, 2011

The Lord Has Risen with ODBD


I am playing with everything I have that is not WINTER themed. I love the set I pulled out from Our Daily Bread Designs called The Lord Has Risen.

Easter is my favorite Christian holiday how much better can it be that the Lord has Risen from the Dead so You and I will never Die. So You and I can live with him forever. "I am the resurrection and the Life" Jesus says, "He who believes in me shall live, even though he dies, and whoever lives and believes in me will never die."

The last Easter my Mom spent on Earth she was heartbroken to the fact the Dr. would not release her from the Hospital to attend Easter Services. My Cousin came and sung some of her favorite songs to her instead. How nice was that? She loved it;)

Product list
Our Daily Bread Designs stamp set The Lord Is Risen
Recollections Flowers
SU ribbon and cardstock
Copic Markers and airbrush system
Prima Pearl Swirls
Nestabilities ovals and shapeabilities Cross Collection
Dimensional Dots

Happy Stamp Day. God Bless.

Monday, November 29, 2010

Lovely Christmas

Most of you know the past few months have been crazy for our family that I have not felt like nor had time to create. It all changed with one phone call from my Aunt, she wanted me to make their Christmas cards this year. Here is one sample I came up with that they loved, I kept it simple(okay it is pretty advanced I should say I kept it one layer so they could avoid extra postage charges).


Step one: Use the center point function on the Cricut to cut your mask. The cartridge I used here was Winter Woodland, Tag at 3 3/4"


Step two: Take Tombow Multi and place around the inside edge of your mask, let this dry and it becomes repositionable. I was able to get 20 cards from one mask. (Use copy paper for the mask if you are going to stamp in a background thick cardstock does not work well for this type of masking).


Step three: Take your Copic airbrush system and spray the center of your mask.

Step four: Place your background image here I used a SU Christmas background Holiday Print (retired) and Pear Pizazz Ink. Here is a tiny hint I use when stamping with the large su background stamps flip the stamp over so the rubber faces up, dab the ink onto the image, place your cardstock over the inked image, place copy paper over the cardstock then brayer over your stack.

Step five: Stamp your main image in a darker color I used Old Olive from SU

Step Six: Do your embossing layers (Detail Gold from SU with Versamark ink)

Happy Stamp Day, God Bless!